A central venous catheter (CVC) is a vital medical device used in various clinical settings for medication administration, hemodynamic monitoring, blood sampling, and other therapeutic purposes. Let us walk you through the essential components and information about CVC kits.
Components of a Standard CVC Kit
 A typical CVC kit contains:
- Central Venous Catheter: Usually 7-20cm in length with multiple lumens (typically 2-4)
- Introduction Needle: For initial venous access
- Guidewire (J-tip): To guide the catheter into position
- Dilator: To enlarge the insertion tract
- Syringe: For flushing and aspiration
- Heparinized Saline: For catheter flushing
- Scalpel: For skin incision
- Sutures: For securing the catheter
- Dressing Materials: Including transparent dressing and antimicrobial patches
- Sterile Drapes: To maintain a sterile field
- Local Anesthetic: Typically lidocaine
- Needles and Syringes: For administering local anesthesia
- Gauze Pads: For cleaning and dressing
- Antiseptic Solution: For skin preparation (chlorhexidine or povidone-iodine)
Types of Central Venous Catheters
- Non-tunneled CVCs: Short-term use (days to weeks)
- Tunneled CVCs: Long-term use (weeks to months)
- Implanted Ports: Completely under the skin for long-term access
- Peripherally Inserted Central Catheters (PICCs): Inserted through arm veins
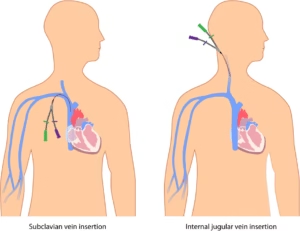
Common Insertion Sites
- Internal Jugular Vein (most common)
- Subclavian Vein
- Femoral Vein
- External Jugular Vein (less common)
General Procedure Overview
- Verify indications and obtain consent
- Gather equipment and check kit integrity
- Position the patient appropriately
- Perform hand hygiene and don sterile PPE
- Prepare the insertion site with antiseptic solution
- Administer local anesthesia
- Identify anatomical landmarks or use ultrasound guidance
- Perform venipuncture with the introduction needle
- Confirm venous access (blood flashback)
- Insert the guidewire through the needle
- Remove the needle while maintaining guidewire position
- Make a small skin incision
- Advance the dilator over the guidewire
- Remove dilator and insert the catheter over the guidewire
- Remove guidewire and secure catheter
- Confirm proper position (usually with chest X-ray)
- Apply sterile dressing
Potential Complications
- Immediate: Arterial puncture, pneumothorax, arrhythmias, air embolism
- Early: Catheter malposition, thrombosis, infection
- Late: Catheter-related bloodstream infection, catheter occlusion, thrombosis
Care and Maintenance
- Daily assessment of necessity
- Proper dressing changes per protocol
- Flushing with heparinized saline to maintain patency
- Monitoring for signs of infection or complications